


Your Quick Prep Guide — Created by Say Jess
WELCOME
Your photoshoot is coming up!
My goal is simple: to capture your essence, your personality, and the little details that make your story unique. During your session, I want you to relax, enjoy yourself, and focus on what feels natural. I’ll take care of the rest.
I know how personal it is to choose a photographer, and I’m so grateful you decided to trust me with this special moment in your life.
Thank you for letting me be part of this experience. I’m excited to create images you’ll treasure for years to come!
Att:

Your Radiant Look: A Guide to Natural Beauty
This guide offers simple steps to enhance your unique features for your photoshoot.
Our aim is to create a naturally beautiful look that makes you feel confident. Remember, your comfort and joy are what truly shine on camera.
STEP 1:

PREP YOUR SKIN
Wash: Start with freshly cleaned skin.
Prime: Apply primer to reduce pores and create a barrier between your skin and makeup.
STEP 2:

APPLY FOUNDATION & CONCEALER
Foundation: Apply dots to your T-zone (forehead, nose, cheeks, chin) and blend with a brush, sponge, or fingers.
Concealer: Focus on areas to hide (under eyes, around nostrils, blemishes). Dab, don't drag. For under-eyes, draw inverted triangles and blend for brightening.
STEP 3:

SETTING POWDER, CONTOUR & HIGHLIGHT
Setting Powder: Apply powder to set liquid makeup and prevent shifting.
Contour: Shape your face (nose, chin, cheekbones) for definition.
Highlight: Apply to high points of your face where the sun naturally hits (cheekbones, brow arch, bridge of nose) and blend well for realistic dimension.
STEP 4:
BLUSH & BROWS

Blush: Choose a tone that highlights your natural undertone. Apply to the apples of your cheeks in a circular motion for a natural flush.
Brows: Enhance shape and fullness with pencils (for natural look), powders, or gels.
YOUR COMPLETE MAKEUP JOURNEY:
A VISUAL GUIDE

Here's a quick visual overview of each step in your makeup application, from start to finish. Use this map as your personal reference to achieve a flawless, photo-ready look for your session. Each step is designed to build on the last, ensuring a harmonious and beautiful result.
Highlighter brings light and dimension to the high points of your face, making them stand out and giving you a radiant glow.
HIGHLIGHTING:
Catch the Light & Glow
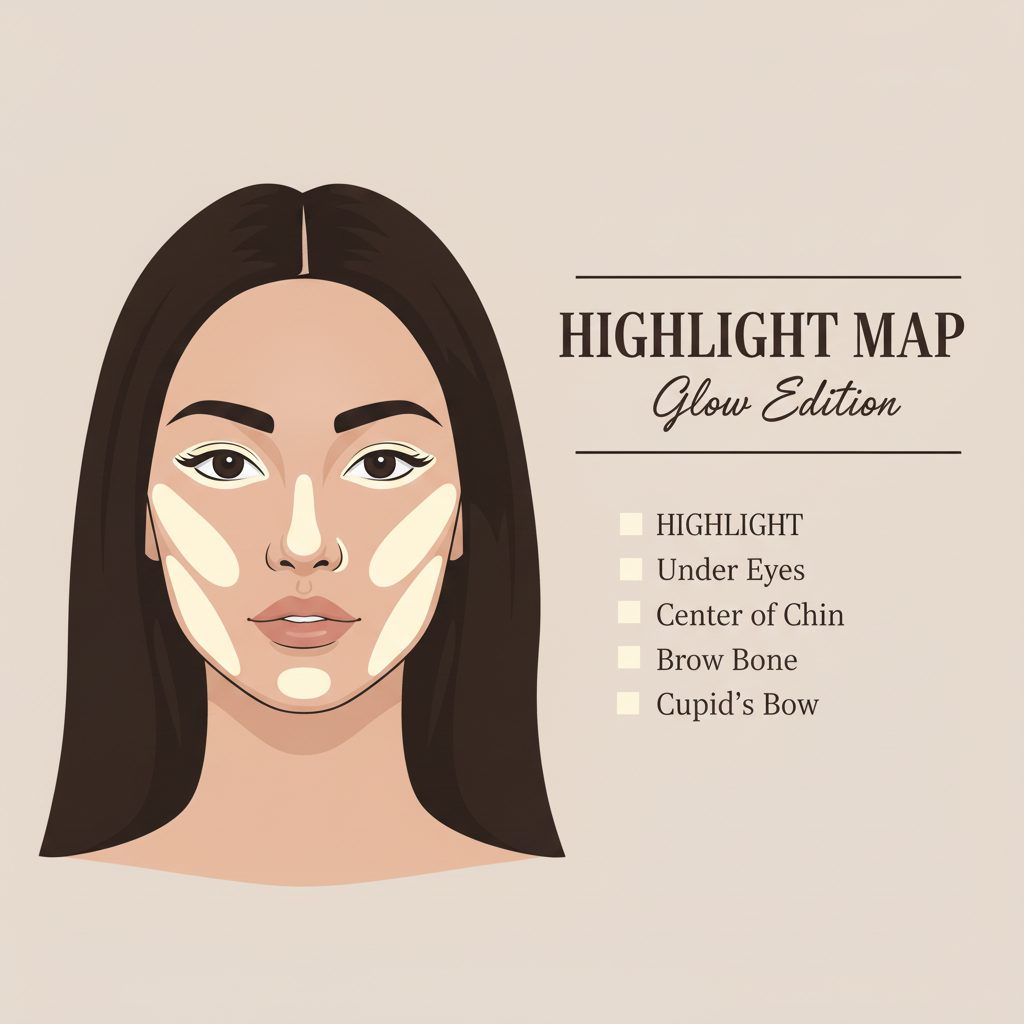
WHERE TO APPLY (Think "High Points the Sun Would Hit"):
Top of Your Cheekbones: Apply along the very top of your cheekbones, extending towards your temples.
Brow Bone: A small dab just under the arch of your eyebrow will lift and open the eye area.
Bridge of the Nose: A thin line down the center of your nose (avoiding the tip if you have oily skin there).
Inner Corner of the Eye: A tiny touch here brightens the eyes instantly.
Cupid's Bow: A small dab on the "V" above your upper lip can make your lips appear fuller.
HOW TO APPLY:
Use a Light Hand: A little goes a long way. You want a natural luminosity, not a metallic stripe.
Blend Softly: Use a fluffy brush, your fingertip, or a small sponge to gently blend the highlighter into your skin for a seamless, natural glow.
Choose the Right Finish: For photos, a finely milled powder highlighter works beautifully. Avoid anything too glittery unless that's the specific look you're going for.
Contouring helps create shadows to define and enhance your face shape, making certain areas appear more sculpted.
CONTOURING:
Sculpting Your Features
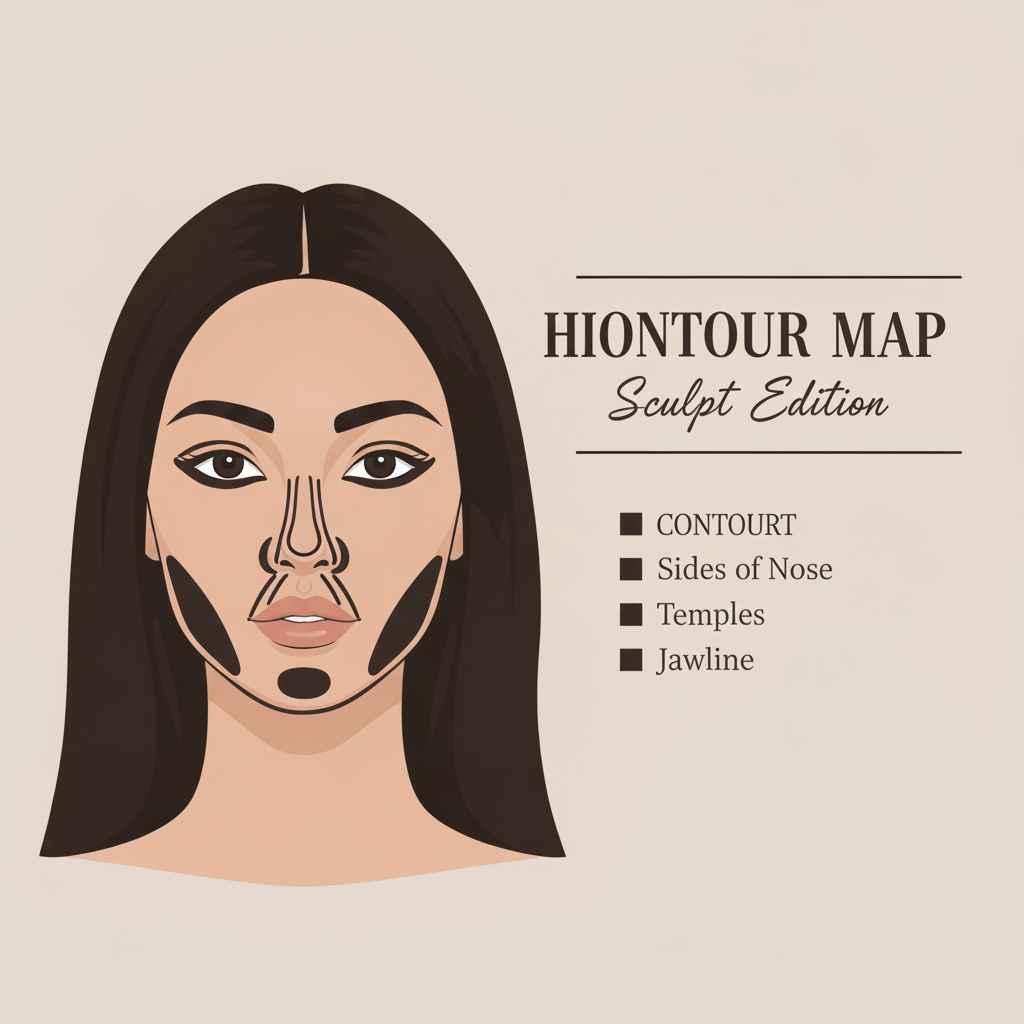
WHERE TO APPLY (Think "Shadows"):
Hollows of Your Cheekbones: Suck in your cheeks to find the natural hollows. Apply directly in this line, starting from your hairline and stopping just before the apple of your cheek.
Jawline: Apply along your jawbone to create definition and a sharper line.
Temples: If your forehead is wider, a touch of contour along the hairline at your temples can help balance your face.
Sides of the Nose: For a more defined nose, draw two thin lines down the sides of your nose and blend carefully.
HOW TO APPLY:
Blend, Blend, Blend! This is the most important step. Use a dense brush or a damp sponge to blend the contour seamlessly into your skin. There should be no harsh lines.
Choose the Right Shade: Opt for a cool-toned, matte contour product (no shimmer!) that is 2-3 shades darker than your skin tone. It should mimic a natural shadow.
Creating the perfect look for your photoshoot is a journey, and I’m here to support you every step of the way. If you have any more questions, please don't hesitate to reach out. I'm only a message away. info@sayjessph.com
Now you are ready to shine!
Let's make this a fun and unforgettable experience together.

Makeup & Hair
While I don’t work directly with makeup or hair artists, I can happily recommend a few trusted professionals if you’d like. I always encourage considering professional makeup and/or hairstyling for your session.
A polished yet natural look not only photographs beautifully but also helps you feel confident and radiant.
A little extra care goes a long way in making you shine in your photos!
If you would like my recommendations, please feel free to contact me directly at info@sayjessph.com.
You are also welcome to work with your own trusted makeup artist or stylist if you prefer.